This page was added to the expanded Crafty Puzzles reference library after the shop closed. It may not have been sold by the original Crafty Puzzles store.
Try a hint before revealing the answer
Open one hint at a time to preserve some of the challenge.
Hint 1
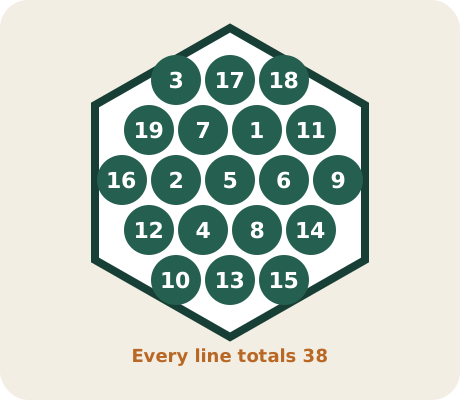
The centre number is 5 in the solution shown here.
Hint 2
Opposite regions must balance because every complete line has the same total, 38.
Hint 3
Solve one outer row, then use intersecting lines to constrain the next numbers.
Written assembly guide
- Place 3, 17 and 18 across the top row.
- Use 19, 7, 1 and 11 on the second row.
- Place 16, 2, 5, 6 and 9 across the middle.
- Use 12, 4, 8 and 14 on the fourth row.
- Finish with 10, 13 and 15 on the bottom row, then verify every straight line totals 38.
Use the preserved diagram or video alongside these steps for exact orientation. The written guide is an original summary prepared for this archive.
Complete Aristotle's Number Puzzle solution
This archive uses an original diagram of the standard order-3 magic hexagon: all 15 straight lines total 38.
Reveal the Aristotle's Number Puzzle solution diagram
Select the diagram to open a full-screen zoomable view. The original file is also available for printing.
Find this or a similar puzzle
Availability changes frequently, so these links search the retailer for Professor Puzzle Aristotle's Number Puzzle rather than displaying unverified prices or stock.
Advertisement / paid links: As an Amazon Associate I earn from qualifying purchases. As an eBay Partner, I may be compensated if you make a purchase.
Retailer links open in a new tab. How affiliate links support the archive.
Source and verification
- Archive source
- Professor Puzzle official product record; solution diagram independently recreated from the standard magic-hexagon arrangement — Official product record
- Information checked
- 13 June 2026
- Verification status
- Challenge rules verified from manufacturer; solution diagram independently recreated
- Page status
- Added during archive research
- Rights handling
- Crafty Puzzles original / recreated material — The visible diagram or explanatory artwork on this page was created for Crafty Puzzles. Source material is credited for factual verification where relevant. Read the site-wide policy